How to Make Shoe Lifts At Home for your Shoe lifts, also known as shoe inserts or height insoles, are commonly used to add extra height or to provide support and comfort. While there are many types of shoe lifts available on the market, you can also make your own at home using a few simple materials. Here’s how
How to Make Shoe Lifts At Home
How to Make Shoe Lifts At Home Whether you are struggling with heel pain or just want to appear taller, heel lifts or shoe lifts just might be the solution to your problem. Heel lifts are becoming more and more popular these days among multiple groups of people as they serve more than one purpose. In this article you will know about how to make shoe lifts at home.

On one hand, the lifts allow you to relieve some of the weight put on the heels and redirect it towards the rest of your foot, which helps greatly with chronic foot pain and inflammation. On the other hand, these lifts can make you appear taller which can be a great confidence boost. Unfortunately, conventional lifts can be very expensive. So here’s how to make your own heel lifts at home for virtually no cost.
Here’s What You’ll Need to Make Shoe Lifts at Home
- Cardboard (the ones from a cardboard box works perfectly)
- Pencil (for outlining)
- Scissors or cutters
- Duct tape
- An existing pair of shoes that you already wear (preferably the ones you’ll put the lifts in)
- A mallet (or something of heavy weight like a big book)
Step by Step Guide on How to Make Shoe Lifts At Home
Before we get started on how to make shoe lifts at home, it must be said that may not get it spot on the first time. However, as this is a very inexpensive process you can just keep making them until you get it right.
Step 1
Take the insole out of the shoe you want to use the lifts in. If you don’t know, the insole is the thin rubber pad that sits on the inside of your shoe. It’s not glued in there so it should come right out.

Step 2
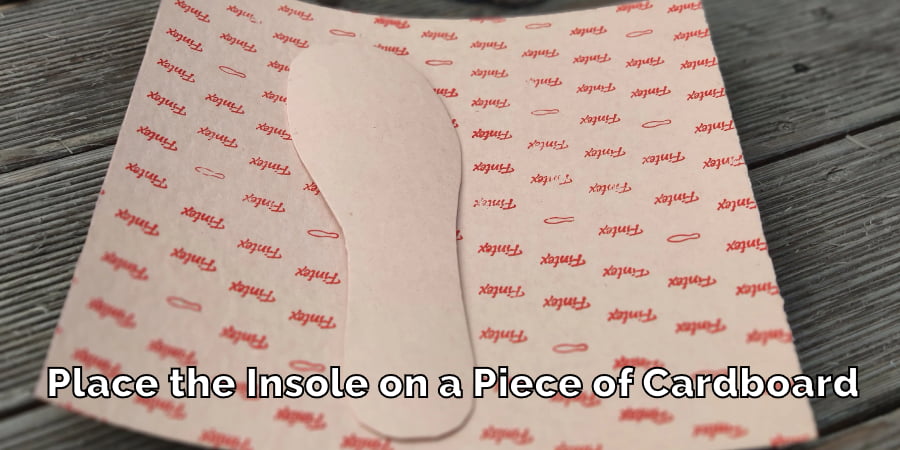
place the insole on a piece of cardboard. If you look closely, you’ll see some lines running through the surface of the cardboard. You want to place the insole on top of the cardboard in a way that the lines are running horizontally (side to side). This allows the cardboard to bend freely and smoothly while you’re walking, causing you no discomfort.

Step 3
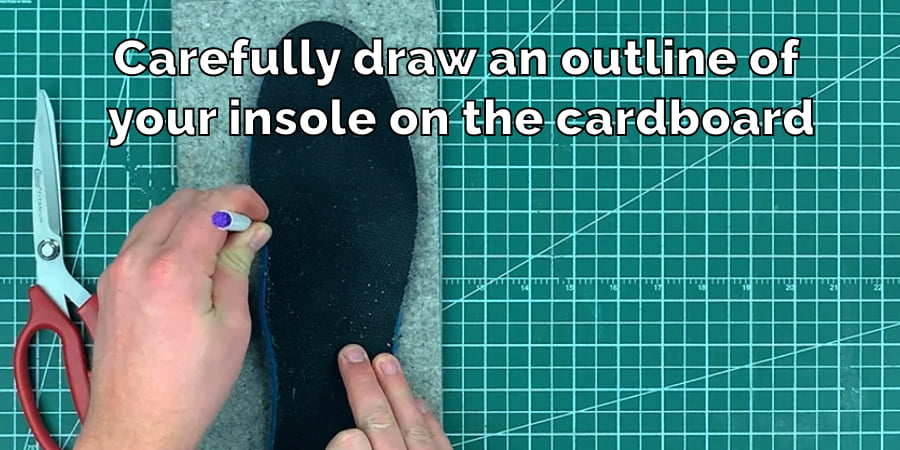
Carefully draw an outline of your insole on the cardboard.

Step 4
Cut out the piece of cardboard. You can just use this piece as the outline for future cuts from now on.
Step 5
This is where it gets a little complicated. See, as we’re working on making your own heel lifts at home, obviously we need to make the heel region of our lifts to be above the other region. So follow closely:
Step 6
Cut out an outline of your first piece of cardboard, but this time you’ll want to make the outline about an 1½ inch shorter from the toe end or the top end. So if the first cutout was the exact size and shape of your insole, the second one will be about 1½ inch shorter from the top.

Step 7
Repeat the same process, but for this piece reduce the size of the outline by another 1½ inch. By now you’ve probably realized, this is how we’ll gradually make the heel part of the lift taller.
Step 8
Continue this process until you have five pieces of cardboard cutouts, each being shorter than the one before from the top. The five cutouts should create the ideal thickness for a heel lift.
Step 9
Now that we’re done cutting, we move on to the next stage of making your own shoe lifts at home. Place the five pieces on top of each other, in order of decreasing length. So the longest piece goes at the bottom, the next longest on top of that and so on.
Step 10
With the cutouts all arranged, carefully duct tape all of them together. Ideally you’d want to apply the tape horizontally. Make sure the edges of the cutouts line up properly when you do this. If necessary, get someone else to help you during this step.
If you’ve made it this far, what you’ll have in your hands right now is an almost ready to use heel lift. From the top it should look like the exact shape of your insole, however from the side the lift should gradually taper off from the heel towards the toe.
Step 11
Use a mallet or a heavy object to lightly tap the lift from above. You’d want to this because right now the lift is quite thick and may be uncomfortable. Obviously it will compress with use but to start off you already want to have it a little compressed for maximum comfort.
Step 12
Repeat the steps above to make one for your other foot, if deemed necessary. Adjust the heel lift on your shoe.
How to Make Shoe Lifts At Home
There you go! Those are the steps you need to take if you want to make your own heel lifts at home. You can make shoe lifts for uneven legs by following these steps.
Frequently Asked Questions
What to Put Under My Shoes to Make Me Taller?
Well according to research, the most effective and clinically safe way to do so is to use shoe lifts or heel lifts! But they do tend to be pricey. So if you aren’t ready to invest on commercial lifts just yet, check out our guide on how to make your own shoe lifts at home.
Do Shoe Lifts Damage Your Feet?
If worn properly, shoe lifts can actually benefit your physical health. Due to posture issues, a lot of times we are putting too much weight on our heels which in turn affects our entire lower body and can cause serious issues including chronic tendonitis. Lifts can help relocate some of this weight, thus relieving said pain.
Does Being Skinny Make You Shorter?
Well research says your weight has almost no effect on your height, however being skinny can actually provide the illusion of being taller than you truly are. Some argue that being overweight causes a person’s relative width to increase, thus they look short and bulky.
Conclusion
Now obviously, traditional heel lifts that you can buy will be more effective as they’re backed by a lot of research and technology. But if you don’t want to commit to a price tag just yet or you’re just exploring options, our guide on how to make your own shoe lifts at home might just be something worth looking at.
How to Make Shoe Lifts At Home
Finally, before you try anything we must advise you to consult a medical professional first, this way you can make sure that you’re being safe at all times.
You may read also – How to Make Shoe Goo Dry Faster